ATTENTION: Due to increased demand and order volume, processing time may take an additional 1-3 business days.
HomeCommunitySubjectPIC16F877A Microcontroller: Datasheet, Pinout and Features

PIC16F877A Microcontroller: Datasheet, Pinout and Features

IC MCU 8BIT 14KB FLASH 40DIP The PIC16F877A is arguably the most popular 8-bit microcontroller in the PIC family of MCUs. This article mainly covers datasheet, pinout, applications, programming, and more details about PIC16F877A.
5578

Sep 2, 2021

Reginald Betty

003 - Introduction to PIC16F877a


IC MCU 8BIT 14KB FLASH 40DIP

The PIC16F877A is arguably the most popular 8-bit microcontroller in the PIC family of MCUs. This article mainly covers datasheet, pinout, applications, programming, and more details about PIC16F877A.
PIC16F877A-E/P

102In Stock
Min.: 1 Mult.: 1
Quantity Unit Price Ext. Price
1+ $10.9095$10.91
10+ $10.29198$102.92
100+ $9.70941$970.94
500+ $9.15982$4579.91
1000+ $8.64134$8641.34
Unit Price:$10.9095
Subtotal: $10.91
Looking for a better price? Want a lower wholesale price? Please send an RFQ, and we will respond immediately.
Quick Links

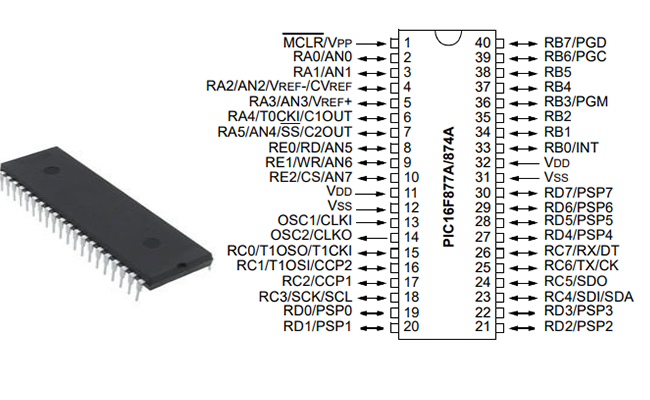
PIC16F877A Pinout


Pin   Number Pin Name Description
1 MCLR/Vpp MCLR   is used during programming,
    mostly connected to programmers like PicKit
2 RA0/AN0 Analog pin 0 or 0 th   pin of PORTA
3 RA1/AN1 Analog pin 1 or 1 st   pin of PORTA
4 RA2/AN2/Vref- Analog pin 2 or 2 nd   pin of PORTA
5 RA3/AN3/Vref+ Analog pin 3 or 3 rd   pin of PORTA
6 RA4/T0CKI/C1out 4 th pin of PORTA
7 RA5/AN4/SS/C2out Analog pin 4 or 5 th   pin of PORTA
8 RE0/RD/AN5 Analog pin 5 or 0 th   pin of PORTE
9 RE1/WR/AN6 Analog pin 6 or 1 st   pin of PORTE
10 RE2/CS/AN7 7 th pin of PORTE
11 Vdd Ground pin of MCU
12 Vss Positive pin of MCU   (+5V)
13 OSC1/CLKI External Oscillator   /clock input pin
14 OSC2/CLKO External Oscillator   /clock output pin
15 RC0/T1OSO/T1CKI 0 th pin of PORT C
16 RC1/T1OSI/CCP2 1   st pin of POCTC
    or Timer/PWM pin
17 RC2/CCP1 2   nd pin of POCTC
    or Timer/PWM pin
18 RC3/SCK/SCL 3 rd pin of POCTC
19 RD0/PSP0 0 th pin of POCTD
20 RD1/PSPI 1 st pin of POCTD
21 RD2/PSP2 2 nd pin of POCTD
22 RD3/PSP3 3 rd pin of POCTD
23 RC4/SDI/SDA 4   th pin of POCTC
    or Serial Data in pin
24 RC5/SDO 5   th pin of POCTC
    or Serial Data Out pin
25 RC6/Tx/CK 6   th pin of POCTC or
    Transmitter pin of Microcontroller
26 RC7/Rx/DT 7   th pin of POCTC
    or Receiver pin of Microcontroller
27 RD4/PSP4 4 th pin of POCTD
28 RD5/PSP5 5 th pin of POCTD
29 RD6/PSP6 6 th pin of POCTD
30 RD7/PSP7 7 th pin of POCTD
31 Vss Positive pin of MCU   (+5V)
32 Vdd Ground pin of MCU
33 RB0/INT 0   th pin of POCTB
    or External Interrupt pin
34 RB1 1 st pin of POCTB
35 RB2 2 nd pin of POCTB
36 RB3/PGM 3   rd pin of POCTB
    or connected to programmer
37 RB4 4 th pin of POCTB
38 RB5 5 th pin of POCTB
39 RB6/PGC 6   th pin of POCTB
    or connected to programmer
40 RB7/PGD 7   th pin of POCTB
    or connected to programmer

PIC16F877A CAD Model

Symbol

Symbol


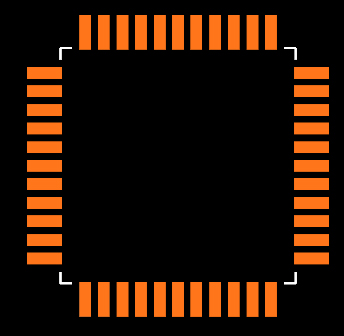
Footprint

Footprint


3D Model

3D Model

PIC16F877A Description

The PIC16F877A is arguably the most popular 8-bit microcontroller in the PIC family of MCUs. While it’s considered by some as old and past its time, the PIC16F877A is no doubt, still one of the most popular microcontrollers in the world. It is seen as the de-facto microcontroller for beginners looking to get into embedded development with PIC and it ends up as the microcontroller of choice for them when they become experts.


Specifications

Microchip Technology PIC16F877A-E/P technical specifications, attributes, parameters and parts with similar specifications to Microchip Technology PIC16F877A-E/P.

PIC16F877A-E/P Tech Specifications

Microchip Technology PIC16F877A-E/P technical specifications, attributes, parameters and parts with similar specifications to Microchip Technology PIC16F877A-E/P.

Product Attribute Attribute Value
Factory Lead Time5 Weeks
MountThrough Hole
Mounting TypeThrough Hole
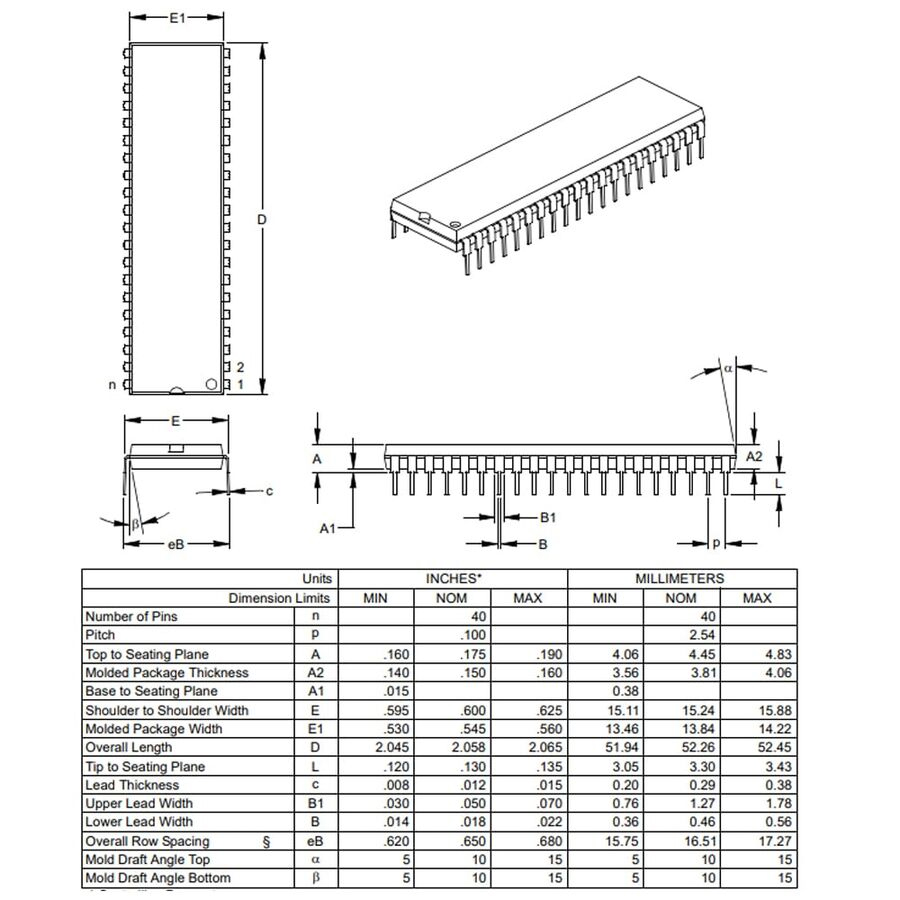
Package / Case40-DIP (0.600, 15.24mm)
Number of Pins40Pins
Data ConvertersA/D 8x10b
Number of I/Os33I/Os
Watchdog TimersYes
Operating Temperature-40°C~125°C TA
PackagingTube
SeriesPIC® 16F
Published1997
JESD-609 Codee3
Pbfree Codeyes
Part StatusActive
Moisture Sensitivity Level (MSL)1 (Unlimited)
Number of Terminations40Terminations
ECCN CodeEAR99
Product Attribute Attribute Value
Terminal FinishMatte Tin (Sn)
Terminal PositionDUAL
Supply Voltage5V
Frequency20MHz
Base Part NumberPIC16F877A
Pin Count40
Operating Supply Voltage5V
Power Supplies5V
InterfaceI2C, SPI, UART, USART
Oscillator TypeExternal
RAM Size368 x 8
Voltage - Supply (Vcc/Vdd)4V~5.5V
uPs/uCs/Peripheral ICs TypeMICROCONTROLLER, RISC
Core ProcessorPIC
PeripheralsBrown-out Detect/Reset, POR, PWM, WDT
Program Memory TypeFLASH
Core Size8-Bit
Program Memory Size14KB 8K x 14
Product Attribute Attribute Value
ConnectivityI2C, SPI, UART/USART
Supply Current-Max15mA
Bit Size8
Access Time20 μs
Has ADCYES
DMA ChannelsNO
Data Bus Width8b
DAC ChannelsNO
Number of Timers/Counters3Timers/Counters
EEPROM Size256 x 8
On Chip Program ROM Width14
CPU FamilyPIC
Number of PWM Channels2PWM Channels
REACH SVHCNo SVHC
Radiation HardeningNo
RoHS StatusROHS3 Compliant
Lead FreeLead Free
0 Products View Similar

PIC16F877A Features

  • Total number of Pins – 40

  • Total number of ports – 5 (port A, port B, port C, port D, port E)

  • Operating Voltage – 2 to 5.5V

  • Number of input/output pins – 33

  • Number of ADC pins – 14

  • ADC Resolution – 10-bit

  • Number of Comparators – 2

  • Number of timers – 3

  • Communication protocols – UART, SPI, I2C

  • External Oscillator – up to 20Mhz

  • Program Memory – 14KB

  • RAM – 368 bytes

  • EEPROM – 256 bytes

  • Max PWM resolution – 10

  • Support both hardware pin and timer interrupts

PIC16F877A Applications

  • Multiple DIY Projects

  • Very good choice if you are learning PIC

  • Projects requiring Multiple I/O interfaces and communications

  • Replacement for Arduino Module

  • Ideal for more advanced level A/D applications in automotive, industrial, appliances, and consumer applications.


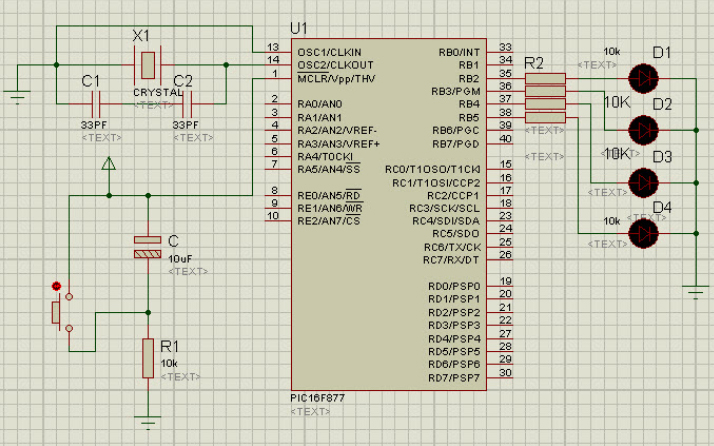
PIC16F877A Circuit

This circuit is designed with the help of Proteus software.

PIC16F877A Circuit


  1. Open the Proteus software. A window with a menu bar appears.

  2. Click the file menu.

  3. Select ‘new design’ from the drop-down menu.

  4. Click the library menu.

  5. Select ‘pick devices/symbol’ from the drop-down menu.

  6. Select the relevant comment by double-clicking it, so that the list of the electronic components appears on the window.

  7. Add all the components and draw the circuit with the proper connections as shown above.


How to program PIC16F877A

The PIC microcontroller programming is performed through ‘MP-Lab’ software. First, we need to do is to install the MP-Lab software, then select and install the compiler like CCS, GCC compiler, etc. Here ‘The CCS C compiler is used for building the program.

  1. First, open the MPLAB software. This shows the menu bar with file, edit, view, project, and tools options.

  2. Select the project option and select the ‘project wired option’ from the drop-down menu. This will show the project wired window.

  3. Select a microcontroller for your project. Here ‘PIC16f877A’ microcontroller is selected.

  4. Select the compiler and path location for your project. Here  ‘The CCS C compiler is selected for the PIC microcontroller, then select the ‘browse’ option from the project wired window to select the ‘ccsloader’ in the PICC  folder from the program files.  A folder with the name ‘source group’ is created in the ‘target’ folder.

  5. Give a name to the project and click on the ‘NEXT’ button to save the project. A folder with the name ‘source group’ is created in the ‘target’ folder. Click on the ‘file’ menu on the menu bar. Select ‘new file’ from the drop-down menu.

PIC16F877A Package

PIC16F877A Manufacturer

Microchip Technology Inc. is a leading provider of microcontroller and analog semiconductors, providing low-risk product development, lower total system cost, and faster time to market for thousands of diverse customer applications worldwide. Headquartered in Chandler, Arizona, Microchip offers outstanding technical support along with dependable delivery and quality.

Datasheet PDF

Download datasheets and manufacturer documentation for Microchip Technology PIC16F877A-E/P.

PIC16F877A-E/P Documents

Download datasheets and manufacturer documentation for PIC16F877A-E/P

Frequently Asked Questions

What is the use of PIC16F877A?
PIC16F877A is used in many pic microcontroller projects. PIC16F877A also has much application in digital electronics circuits. PIC16f877a finds its applications in a huge number of devices. It is used in remote sensors, security and safety devices, home automation, and many industrial instruments.
What is meant by PIC16F877A?
PIC16F877a is a PIC Microcontroller and is normally used in Embedded Projects like Home Automation systems, Bank Security systems, etc.
How many timers are in PIC16F877A?
Pic16f877a has three independent timers which can be used as timers, Counters, or for PWM generation.
How do I use PIC16F877A Mplab?
Step1: Open the MPLABx software and select the New project from File Menu as shown below. Step2: Select the Standalone option for the project. Step3: Choose the Controller (PIC16f877A) from the device dropdown. Step4: Select the required programmer.
FAQ
What is the use of PIC16F877A?
PIC16F877A is used in many pic microcontroller projects. PIC16F877A also has much application in digital electronics circuits. PIC16f877a finds its applications in a huge number of devices. It is used in remote sensors, security and safety devices, home automation, and many industrial instruments.
What is meant by PIC16F877A?
PIC16F877a is a PIC Microcontroller and is normally used in Embedded Projects like Home Automation systems, Bank Security systems, etc.
How many timers are in PIC16F877A?
Pic16f877a has three independent timers which can be used as timers, Counters, or for PWM generation.
How do I use PIC16F877A Mplab?
Step1: Open the MPLABx software and select the New project from File Menu as shown below. Step2: Select the Standalone option for the project. Step3: Choose the Controller (PIC16f877A) from the device dropdown. Step4: Select the required programmer.

TAGS

Share